Introduction
In our previous blog post, we provided an overview of pulsed lasers and how the exposure time of a camera must synchronize with a laser pulse to provide an accurate measurement. We talked about how Auto-Trigger Mode can be used to measure pulsed lasers with no formal synchronization by setting an appropriate exposure time and rejecting partial pulse captures. This blog post will now talk about how an external trigger can be used to formally synchronize the exposure time to the pulse width. This External Trigger mode provides more versatile and precise measurements of pulsed lasers.
Overview
The ideal method of analyzing pulsed lasers is using a camera with global shutter that supports an external trigger. Use of an external trigger has the advantage of synchronizing each exposure to the start of a laser pulse. This eliminates the partial pulse issue encountered in Auto-Trigger mode, but requires an external trigger input to the camera that is synchronized to the laser pulse train.
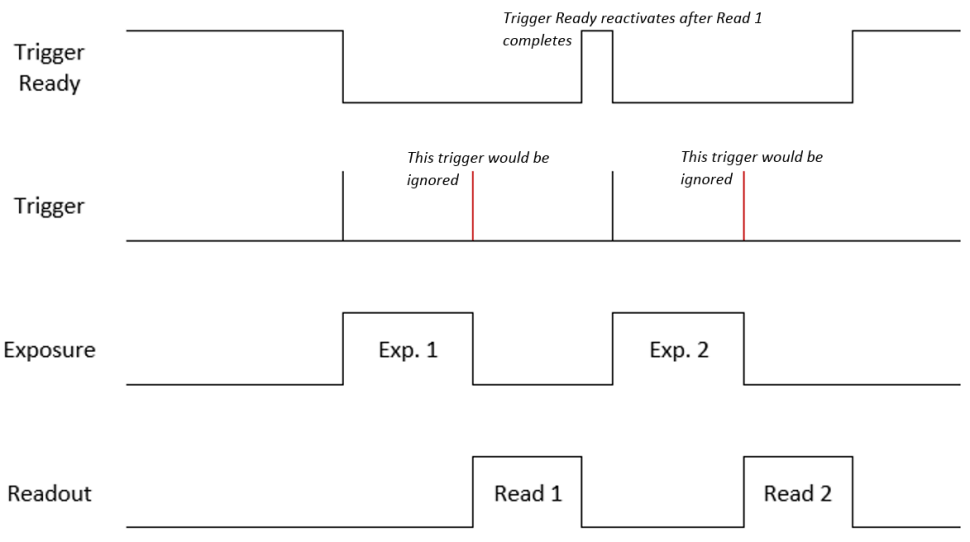
The software starts in a “Trigger Ready” state where it is awaiting a trigger signal before beginning an exposure. When the external trigger signal is detected, the exposure begins for the set exposure time. The “trigger ready” state is immediately disabled until after the exposure completes and the data is read out to the software. Any external triggers are ignored until the “trigger ready” state is reactivated after the frame has finished transferring to the software.
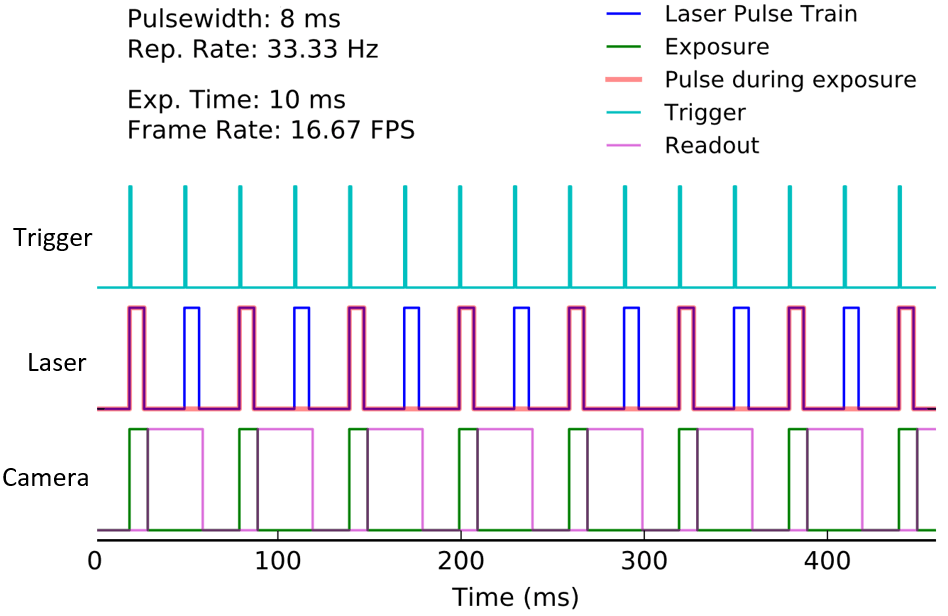
External trigger mode provides better control than Auto-Trigger, since each exposure can be synchronized to a laser pulse. This eliminates the issue of partial pulse capture if the exposure time is set appropriately. External triggering also allows for measurement of pulsed lasers that may change in irradiance during system adjustments, since it is not constrained to an ADC % range. The example in Figure 2 shows a laser where every other pulse is captured by the camera. There is a trigger before every pulse, but some triggers are ignored while the camera is busy exposing or reading out a frame. If the camera frame rate is increased higher than the laser repetition rate, using a smaller capture block or fast mode to decrease readout time, it may be possible to capture every laser pulse. The camera’s exposure and readout would have to complete before the next trigger signal occurs.
The Maximum Single Pulse Capture Pulse Repetition Rate (PRR) defines the maximum pulse repetition rate for which the camera can capture individual pulses--but not every pulse. This is limited by the shortest exposure time the camera can use. The Maximum Every Pulse Capture PRR is the maximum pulse repetition rate for which the camera can capture every individual pulse. This is limited by the camera’s frame rate. The cameras can still provide useful measurements for lasers with a PRR higher than these limits by capturing an average of several pulses.
| Beam Profiling Device | Maximum Single Pulse Capture PRR | Maximum Every Pulse Capture PRR |
|---|---|---|
| WinCamD-LCM – 1" CMOS System, USB 3.0 | USB 2.0: 6.3 kHz USB 3.0: 12.6 kHz |
~60Hz |
| WinCamD-UCD12 – 1/2" CCD System | ~20 kHz | ~10 Hz |
| WinCamD-UCD15 – 1/1.8" CCD System | ~20 kHz | ~10 Hz |
| WinCamD-UCD23 – 2/3" CCD System | ~20 kHz | ~10 Hz |
Software
Triggering options in the DataRay software can be accessed using the Trigger Setup dialog opened from the Setup menu bar option by choosing Setup Trigger.
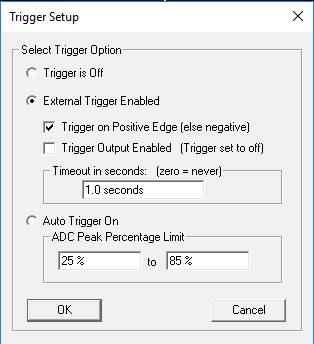
This dialog box provides simple options for setting up the desired triggering mode. If External Trigger is enabled, the trigger can be chosen to correspond with the positive or negative edge of the TTL input trigger signal. The Timeout in seconds controls how long the software will wait for a trigger signal—this should be set to a value of at least 1 second, or set to zero to disable any timeout.
The trigger delay can be adjusted if the laser pulse lags slightly behind the trigger input. The trigger delay can also be used to start the exposure in the middle of a pulse, if it is desired to only measure the last part of the pulse. The option to measure only the first part of a pulse can also be accomplished by setting a Trigger delay of 0 ms, and an exposure time shorter than the pulse width. By carefully choosing the trigger delay and exposure time, it is possible to “dissect” a pulse by measuring specific portions of a pulse at a time.

Once the desired settings are chosen, press Go to have the camera begin waiting for a trigger to start an exposure. After the first trigger arrives, the exposure will complete and be read out to the software. Then the software will wait for another trigger and the box in Figure 5 will update to read Waiting for #2.

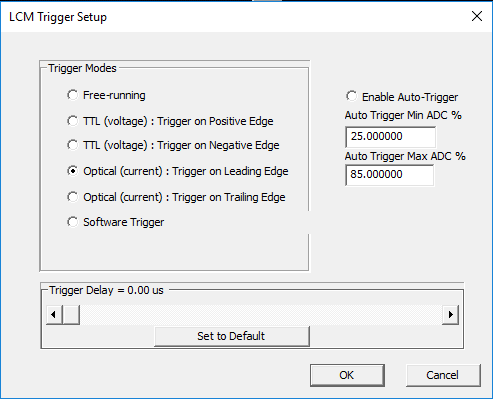
Optical Trigger
The WinCamD-LCM camera can optionally make use of an optical trigger by allowing a current input instead of a TTL voltage input. The trigger can correspond to the leading or trailing edge of the current input signal.
Conclusion
DataRay offers a selection of cameras to provide several options for analyzing pulsed lasers. In addition to Auto-Trigger mode for simple unsynchronized measurements of laser pulses, there is also an External Trigger mode that accepts an external input signal to synchronize the exposures with laser pulses. External trigger mode allows for more controlled measurements, and even allows for the ability to “dissect” a single pulse by measuring specific portions of a pulse at a time. The next blog post will discuss pulse energy, and how the Imager Gain is used to control image intensity when measuring pulsed lasers. If you have any questions regarding beam measurement methods for your application, please contact us. We have years of experience in laser beam profiling and would love to discuss a solution for your system.
Author: Loren Jones
Products Mentioned

WinCamD-LCM
- Versatile global shutter supports CW & pulsed beams
- 355 to 1150 nm standard with UV, 1310 nm, and 1550 nm options
Related News
Pulsed Lasers: Pulse Energy & Imager Gain
Pulsed Lasers | January 10, 2017
This is the third entry in a series of blog posts that explore DataRay’s pulsed laser measurement capabilities. This blog post will talk about the energy requirements involved with measuring pulsed lasers, and how the received signal can be controlled when the exposure time is fixed.
Pulsed Lasers and Auto-Trigger Mode
Pulsed Lasers | November 21, 2016
This is the first entry in a series of blog posts that explore DataRay’s pulsed laser measurement capabilities. This blog post will review how capturing pulsed lasers with a camera beam profiler differs from capturing CW lasers, and how the additional challenges with pulsed lasers are handled to provide useful measurements with the software’s Auto-Trigger mode.